Thursday, January 12, 2012

Sed Command Search Replace Delete Add Line Tricks and Tips

sed -e "expression script"
-i to edit in place" Edit and save"

Sed How to Replace slash / And backslash \ character
Slash represent as Normal /
backslash \ represent as \\
Example:
# cat sedlinux.txt
hi/kumar\kumar/
a)sed 's:\\:/:g' sedlinux.txt [ change back slash \ into slash / ]
hi/kumar/kumar/
b)sed 's:/:\\:g' sedlinux.txt [ change slash / into back slash \ ]
hi\kumar\kumar\

#sed 's:/var/www/html:/home/username:g' filename
|Replace /var/www/html to /home/username
#sed -n '1~3p' filename | Print Every 3rd Line 1st,1+3 4th,7th line.
#sed -n '0~2p' filename | Print Every 2nd LIne 0st,2nd,4th,6th,

#sed '3i New Line' filename.txt | It will add New Line On 3rd Line.
#sed -n '0~2i word' file | Add the new line in 0,2,4,6 th Line.

To delete the line with matching Character

#sed -i '/matchword/d' phone.txt
#sed -i '/^$/d' phone.txt  - ^$ it will delete the empty lines
#sed '0~2d' filename -  d Delete Line - 0,2,4,6

Replace every second occurrence in the line.
#sed ‘s/Search_Word/Replace_Word/2’ filename
Sed Replace with variable
#sed “s/$Search_Variable/$Replace_Variable/g” filename
read more "Sed Command Search Replace Delete Add Line Tricks and Tips"

/usr/bin/ld Cannot Find Library Path Linkage Problem

STUDY : Open Source Application MakeFile Important Environment Variable.
CFLAGS     - C Compiler Flags.
LDFLAGS  - Library Path
CC C          - Compiler Command.
-L - User Define Library path Example -L /usr/X11R6/lib/.
-l  - Search from Common Library Path(/lib) -lX11.
#gcc -L /folder/contain/library/path/event/ -levent.

When I try to install Open Source Application I got the Following ERROR MESSAGE:
/usr/bin/ld: cannot find -lX11
collect2: ld returned 1 exit status
make: *** [eterm] Error 1

REASON : This type of issue Happened when it does not find the Proper Libraries in the Default Path(lib)  or (-L) Specified Location.


FULL ERROR MESSAGE : cc -o eterm main.o init.o close.o font.o gc.o api.o sink.o select.o serial.o print.o tot_compose.o -O2 -Wall -fomit-frame-pointer -march=i386 -s -L /usr/X11/lib libansi.a libvt.a libsie.a libtel.a libwy.a -lX11 -L ../../OPT/MLT-Display-Lib/ -liscdisp -lstdc++ -L ../../opt/getval -lgetval
/usr/bin/ld: cannot find -lX11
collect2: ld returned 1 exit status
make: *** [eterm] Error 1

SOLUTION:
1) We have to install the Proper Library Package.
2) Or if it is already installed, we need to Link the Correct Library Path with -L and -l Option.
....-march=i386 -s -L /usr/X11/lib .... libtel.a libwy.a -lX11
From the Above Statement it tries to find the Library X11 from /usr/X11/lib.
 But it can't find, Because  X11 Located in /usr/X11R6/lib/.
So we have to replace from /usr/X11/lib to /usr/X11R6/lib. Change this Variable (LDFLAGS) in Makefile.

How To Find Out,Whether Library Package Is Already Install Or Not.
METHOD 1
#gcc program.c -lgetval
1)-lgetval is Library.
2) It is located under Default Library Path /lib
3) To find #locate getval | grep lib
File is located under /lib/libgetval.so
METHOD 2
#gcc graphics.h -L /usr/X11/lib –lX11
1) We have to Search Xll library path under /usr/X11/lib
2) #find /usr/X11/lib –name X11*
3) If it is not located, we have to search whether is it located in any another Path. Like
4)#find / -name X11*
5)if it is locate then change –L Correct Directory Path or
 6)if it can't find anywhere else, Then we have to install particular library.

Similar Error Message:
/usr/bin/ld: cannot find -lz
 
/usr/bin/ld: cannot find -lc
 
/usr/bin/ld: cannot find -lgcc_s_32

/usr/bin/ld: cannot find -lXaw
 
/usr/bin/ld: cannot find -lImlib2
 
/usr/bin/ld: cannot find -lperl
read more "/usr/bin/ld Cannot Find Library Path Linkage Problem"

Compile Kernel Install Remove Kernel Driver Module

Purpose- Reason For Kernel Compilation
Advantages
1) It is easy to Add New Features.
2) For new Hardware if it does not have proper
kernel Module, then we can rebuilt the kernel through Kernel compilation.

How To Compile Linux Kernel Source code.
1) Go to the Linux Kernel Directory/usr/src/kernels/2.6.9-5.EL-i686
Type #make menuconfig
2) Configure & compile the Kernel Source Code
For Example To Add Driver  for Key board Choose the Following Sub Menu from the #make menuconfig.
-make menuconfig - Device Drivers - Input Device Support - Keyboard - Choose the Keyboard,
3)#make menuconfig. It will build their Kernel Driver Modules Under /lib/module/`uname –r`

Linux Kernel Important Directories
1)/lib/modules/`uname -r` - Kernel Driver Modules
/lib/modules/2.6.9-5.EL/kernel/drivers/ - Contain the Linux Kernel Driver.
2) /usr/src/kernels/2.6.18-128.el5/ Contain the Linux Kernel Source.
3)/usr/include/linux - It contain the List of Header Files
/lib/modules/2.6.9-5.EL/kernel/drivers/net/ - Network Driver Modules
/lib/modules/2.6.9-5.EL/kernel/drivers/input – Keyboard, Mouse Driver Modules

How To Find Module Dependencies List Modules
lsmod  List Modules Get the Information From the /proc/modules.
depmod list the dependencies module.
depmod -v List Which module is depend on the other module.
For Example: via-velocity.ko it is Network Module located Under /lib/modules/version/kernel/drivers/net/filename.ko
/lib/modules/2.6.9-5.EL/kernel/drivers/net/via-velocity.ko needs "crc_ccitt": /lib/modules/2.6.9-5.EL/kernel/lib/crc-ccitt.ko
.ko it is kernel Modules

How To Install Or Remove The Module Loading / Unloading Module
modprobe - Install/remove the Module
insmod - Insert The Module
rmmod - Remove The Module
Compression Between modprobe And insmod/rmmod
1) For modprobe there is no need to mention any path. It is automatically install the module. But Insmod , rmmod we have to mention the Path.
Example:
#insmod kernel/drivers/net/wireless/airo.ko
2) Using Single Command we will Install & Remove Module for modprobe. We had separate command like insmod , rmmod.
read more "Compile Kernel Install Remove Kernel Driver Module"

Difference Between Incremental Backup Differential Backup Rotational Backup

Incremental Backup: Backup of files that's are NEW or CHANGED Since Last Backup.
Backup Time: It will take the least time.

Differential Backup: Backup of the files, which are NEW or CHANGED Since LAST FULL Backup.
Backup Time : It will take more time compare to Incremental Backup.

Comparison : Incremental Vs Differential
Differential Backup it is middle stage between Full Backup & Differential Backup.
Main Difference is Incremental take backup from Last Backup. Differential take backup from LAST FULL Backup,

FULL BACKUP: Complete Backup of everything.
Backup Time: It will take more time rather than DIFFERENTIAL BAKUP.
read more "Difference Between Incremental Backup Differential Backup Rotational Backup"

How To Create initrd Image Temporary File System initrd

1)initrd is a image file.
2)initialize Ram Disk Image.
3)initrd is temporary file system used in the boot Process of the Linux Kernel.
4)initrd contain basic executable files utilities and Essential Drivers, that leads kernel to mount root File system.
5)In these temporary file system it contain directory, bin,etc,init,dev,lib,loopfs,proc,sys,sysroot File is init.
6)This initrd image Contain the Same version & Number of kernel
Example
initrd Image initrd-2.6.9-5.EL.img
kernel vmlinuz-2.6.9-5.EL


How To Extract Initrd File.
#gunzip < /boot/initrd.img | cpio -i
cpio -i It will Extract the Image.
-o Create the Image
-v Verbose.
1) Copying files from Archive
2) Extracting Files from Archive
#ls /etc/*.conf | cpio -o --forma=tar > conf.tar
read more "How To Create initrd Image Temporary File System initrd"

Compare Time stamp In Shell Script year, Month day, Hour, Minute, Second

Linux How To Compare the timestamp
1) Using Date command we can compare
2) In these format i used just simple numberical comparsion and it'wll work for timestamp comparsion.
Year-Month-day-Hour-Minute-second.
3)syntax
Date1=`date +%Y%m%d%H%m%S`;
Date2=`date +%Y%m%d%H%m%S`;
if(Date1 Condition Date2)
date +
%y - Year in Two Digit
%Y - year in Four Digit
%m - month in Numberic
%d - Date
%H- Hours
%h - Month in String

For Example
current_time=`date +%Y%m%d%H%M%S`;
Year-Month-Date-Hour- Minute-Second
if [ "$login_time" -lt "$current_time" ]; then
How To Compare  Time stamp in Shell Script.
read more "Compare Time stamp In Shell Script year, Month day, Hour, Minute, Second"

How To Configure RSH – Remote Shell

1) Enable rsh
#vim /etc/xinetd.d/rsh
Replace 
disable=yes into disable=no
wait = yes into wait=no
2) Enable rexec
#vim /etc/xinetd.d/rexec
Replace
disable=yes into disable=no
wait=yes into disable=no
3)Enable rlogin
#vim /etc/xinetd.d/rlogin
disable=yes into disable=no
wait=yes into wait=no
4) Enable securetty
Add rsh,rlogin.rexec into the /etc/securetty
/etc/securetty
Enable the service for login with tty devices.
5) PAM - Pluggable Authentication Module.
Purpose
1) Authentication condition.
2) Define the Session Module.
#vim /etc/pam.d/rsh
Replace
auth required pam_rhosts.so into
auth sufficient pam_rhosts.so

6) Add the trusted Host List
#vim /root/.rhosts
List of hosts Login without password or server admin granted "TRUSTED"
rsh/rlogin Remote access without supplying Password.

Finally trying from the Client Machine, using rsh,rlogin,to verify rsh- Remote shell.
read more "How To Configure RSH – Remote Shell"

Difference Server Type Hardware Configuration Data Center

RACK Server: 
1) Rack server is typically measured by U’s scale in vertically.
Like 1U, 2U, 3U.
BLADE Server: 
Blade server an additional level innovation of RACK Server.
It has two parts.
a) Blade carrier
b) Blade Server
Blade server typically placed inside the Blade Carrier by together they form blade system.

Advantages
Hot Plugging like, Network ports, Power Connection, Switches are modular design.
There is no need to plug manually. Just we have to insert the blade server into blade carrier.

read more "Difference Server Type Hardware Configuration Data Center"
Monday, December 19, 2011

How to Create Color Palette In Java Coding IT1403

To create a color palette in Java.
Algorithm -IT1403 Software Components LAB
Step 1: Import necessary packages.
Step 2: Write applet code which should specify width and height of applet window.
Step 3: Create a class ColorPalette extend JFrame
Step 4: Create a button and named as Change Color.
Step 5: Create a constructor
Step 6: In that constructor, define the logic for event in actionPerformed method.
Step 7: In main function invoke the constructor.
Step 8: Compile and run the program.

Source code Programming Algorithm
import javax.swing.*;
import java.applet.*;
import java.awt.*;
import java.awt.event.*;
public class ColorPalatte extends JFrame
{
private JButton chgCor;
private Color color=Color.lightGray;
private Container c;
public ColorPalatte()
{
super("Using JColorChosser");
c=getContentPane();
c.setLayout(new FlowLayout());
chgCor=new JButton("Change Color");
chgCor.addActionListener(new ActionListener()
{
public void actionPerformed(ActionEvent e)
{
color=JColorChooser.showDialog(ColorPalatte.this,"Choose a color",color);
if(color==null)
color=color.lightGray;
c.setBackground(color);
c.repaint();
}
}
);
c.add(chgCor);
setSize(400,130);
show();
}
public static void main(String arg[])
{
ColorPalatte app=new ColorPalatte();
app.addWindowListener(new WindowAdapter()
{
public void windowClosing(WindowEvent e)
{
System.exit(0);
}
}
);
}
}
read more "How to Create Color Palette In Java Coding IT1403"

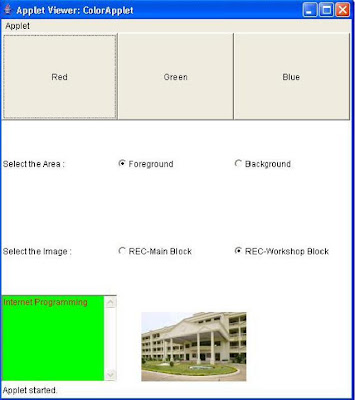
Color Palette with matrix of buttons | Background and Foreground in control text area by selecting form color palette & checkbox as radio button

Aim To write a java code to implement
Color palette with matrix of Buttons
Background and Foreground in control text area by selecting form color palette and selecting from the check box CS1404 INTERNET PROGRAMMING LABORATORY
Algorithm for color palette
Start color palette the program
Declare the color palette class with applet
And implement Action Listener and Item Listener
Then create Check box Group
Create Image object
In init() function declare the necessary layout, checkbox and image
Then in the action performed function to implement their appropriate action
Finally terminate Color palette the program


Source Code Color Palette in java program
import java.awt.*;
import java.awt.event.*;
import java.applet.*;
public class ColorPalette extends Applet implements
ActionListener, ItemListener {
Button btnRed, btnGreen, btnBlue;
String str = "";
CheckboxGroup cbgColor;
CheckboxGroup cbgImage;
Checkbox optFore, optBack;
Checkbox optMb, optWsb;
Image imgMb, imgWsb;
TextArea txtaComments = new TextArea("", 5, 30);
public void init() {
setLayout(new GridLayout(4, 3));
cbgColor = new CheckboxGroup();
cbgImage = new CheckboxGroup();
Label lblColor = new Label("Select the Area :") ;
Label lblImage = new Label("Select the Image :") ;
optFore = new Checkbox("Foreground", cbgColor,true);
optBack = new Checkbox("Background", cbgColor,false);
optMb = new Checkbox("REC-Main Block", cbgImage,true);
optWsb = new Checkbox("REC-Workshop Block",cbgImage, false);
btnRed = new Button("Red");
btnGreen = new Button("Green");
btnBlue = new Button("Blue");
BB / REC - 17
imgMb = getImage(getDocumentBase(),
getParameter("recmb"));
imgWsb = getImage(getDocumentBase(),
getParameter("recwsb"));
add(btnRed);
add(btnGreen);
add(btnBlue);
add(lblColor);
add(optFore);
add(optBack);
add(lblImage);
add(optMb);
add(optWsb);
add(txtaComments);
optFore.addItemListener(this);
optBack.addItemListener(this);
optMb.addItemListener(this);
optWsb.addItemListener(this);
btnRed.addActionListener(this);
btnGreen.addActionListener(this);
btnBlue.addActionListener(this);
}
public void actionPerformed(ActionEvent ae) {
str = cbgColor.getSelectedCheckbox().getLabel() ;
if(ae.getSource() == btnRed &&
str.equals("Background")) {
txtaComments.setBackground(Color.red);
}
if(ae.getSource() == btnRed &&
str.equals("Foreground")) {
txtaComments.setForeground(Color.red);
}
if(ae.getSource() == btnGreen &&
str.equals("Background")) {
txtaComments.setBackground(Color.green);
}
if(ae.getSource() == btnGreen &&
str.equals("Foreground")) {
txtaComments.setForeground(Color.green);
}
if(ae.getSource() == btnBlue &&
str.equals("Background")) {
txtaComments.setBackground(Color.blue);
}
BB / REC - 18
if(ae.getSource() == btnBlue &&
str.equals("Foreground")) {
txtaComments.setForeground(Color.blue);
}
}
public void itemStateChanged(ItemEvent ie) {
repaint();
}
public void paint(Graphics g) {
if(optMb.getState() == true)
g.drawImage(imgMb, 200, 400, this) ;
if(optWsb.getState() == true)
g.drawImage(imgWsb, 200, 400, this) ;
}
}

Output:- CS1404 INTERNET PROGRAMMING LABORATORYComplie color palette program
C:\IPLAB>javac ColorPalette.java
Run the color palette program
C:\IPLAB>appletviewer ColorPalette.java

Color Palette with matrix of buttons  Background and Foreground in control text area by selecting form color palette & checkbox as radio button
read more "Color Palette with matrix of buttons | Background and Foreground in control text area by selecting form color palette & checkbox as radio button"

Flag counter

free counters